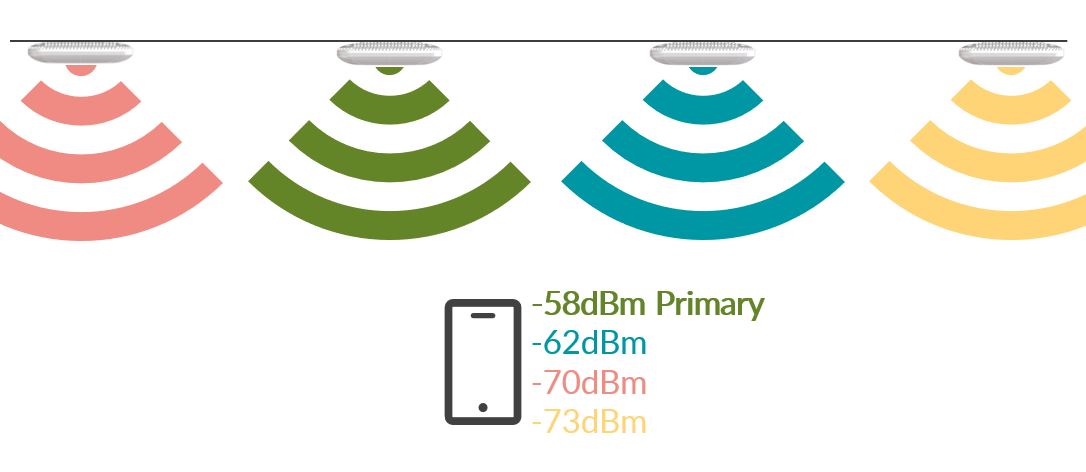
Hello. In this video, we will look at designing our office based environment to meet our primary signal requirement of – 65 dBm. The primary coverage is defined as the minimum signal strength required in each location from the strongest access point. So in this example, our client receives the green signal at -58 dBm, the blue signal at -62 dBm, the red at -70 dBm, and the yellow at -73 dBm. So our strongest and primary signal strength is -58 dBm from the signal shown in green.
So let’s look at how we design our building to a -65 dBm primary signal requirement. Now, the exact methodology you would use will depend a little bit about what’s available in your design software. But let me show you two common methodologies which you can both do inside Ekahau software, but it won’t necessarily both be available in all software.
The first one is what I would probably count as a sort of drag and drop solution. This is where we just pick an access point we want to place onto our design. In this case, I’m going to pick the Mist AP43, and we drop it similar onto our design, and we can see what coverage we get from that AP. Now, as I showed in a previous video, inside this office design, I’ve already specified and entered in my requirements. I’ve already said that the primary signal requirement should be -65 dBm. We did that under project and requirements. And I created our office requirements, and I’ve specified a signal strength requirement to be -65 dBm. So that’s why these color contours, the edge of it is showing -65 dBm, as we can see here in our visualized [inaudible 00:02:43] legend. So everywhere I see color, that’s meeting my requirement. Everywhere I see gray, it’s failing my requirement.
Now, you’ll often hear it said, “All you need to do is now paint the map green.” And one thing I want to just make clear is that green doesn’t necessarily mean good. Because I could very easily come in here and change what my requirement was. And I can make sure, by sliding these sliders around, it all looks green. So even though I’ve got one AP, if I come in here, I can make the entire map almost look nice and green. But is it meeting my requirement? No, it’s not.
On the other hand, if I put these back to showing some sensible values for my requirements, I can make this look as I want it to look. Whereas, the green contours are now shown where I meet my requirements, the gray are showing where I’m below my requirement, but I’ve still got enough signal strength to be decoded by radios. And then I’ve set -85 dBm to where it goes to white. So any signals below -85 dBm probably are going to be difficult to decode at that distance. It doesn’t show any coverage.
But if I change to a different color scheme here, now, red is showing where good signal is, and orange and yellow, but it’s not green. So it’s important when we’re looking at wireless designs, we don’t just think, “Green always makes good, it always means good when we’re looking at the heat map.” No, red can mean good. It’s really upon we understand how the softwares configured and which settings we’ve got set, so that we can interpret a survey correctly. Now, my preference tends to be to use green to mean we meet the requirements, and red or gray to mean we don’t.
So having [inaudible 00:05:26] we’ve configured our legend correctly, and we’ve got the coloring we want, we can now go and place some more APs. So we can see where this access point meets our requirements, so therefore, we can see where we need to place another AP. So I might come down here and place another access point down here. And I can see that, “Oh, I don’t quite meet the requirement in this little area, so I may want to turn its access point and drag it over one room and just fill in that gap.” And I go on and place another access point. And I keep going until I’ve filled in all the gray areas. So that’s one method of designing for prime coverage. Let me delete these APs and show you another method. I’m just going to select all these APs, and we’re going to delete them.
So another method would be to use what, well, in Ekahau, it’s called coverage planing too, but it may be called different in different tools. But this is where I can move my cursor around the building in real time and see the coverage. And now, one thing again we’ve got to be careful at is what signal strength I’m modeling the coverage at. I want to do this with my requirement, which is -65 dBm. So I’m just going to set that on this slider down here. So now, I can see the green is showing me where I meet my requirement. So I can come in here, and I can place my first access point. And now, I can see, “Where do I place my second access point so I’ve got good coverage?” So I might place another access point, and I can start to look at the different places I may want to place my access points.
I can also start to think through, “Are there better locations?” And move these access points around if I want to. So I could say, “Well, if I move that one over, do I now cover that hole?” So we can start moving APs around. Be careful to not do what I just do did that was when trying to move APs that you actually move a wall, because that’s not going to be as useful to your design. So we can start to place access points in different locations, as you can see.
Having done that, I could then go back, and just look at the… I clicked the wrong button there. But the primary signal strength, and I can see that I’ve got a nice coverage around my entire building, apart from one area. And that area is this lift lobby. You can see in the lift lobby that I’ve got gray area here. Now, one thing you want to be aware of in places like lift lobbies, sometimes you can’t place access points inside the lobby, because maybe it’s difficult to get cable in there, or maybe it’s a multi-tenant building, and the lobby’s actually owned by the building owner and you’re not actually allowed to place your equipment in there. So we may want to place another access point just outside the doors to the lift lobby here, which is going to provide coverage inside. So now, I’ve got my primary signal strength and primary coverage using six access points around this office environment.
Now, it’s really important when using design software that we are using software which can model and have the antenna patterns of the model of AP we’re actually going to install. So if we’re installing from Mist access points, it’s important we’re using software which models the antenna and coverage pattern of Mist access points.
What we don’t want to do is design, and then say, “Oh, we’ll pick the AP model later.” The AP model should always be chosen during the technical requirements phase of the define phase. Let’s have a look at if we decided to do that and some of the problems. Let’s say I decided to change all my access points to a different model. So let me do a quick select, and select all my access points. And we are going to change them to be this generic AP. Now, there’s no such a thing are generic AP. But if you decided to design for generic AP, and then maybe you said you were going to come back and change the AP model later, look what’s happened. I’ve now got areas where I don’t have coverage, because I’ve changed what antenna I’m using on the APs, and I would need a different design. So it’s really important that we make sure we’re always going to design to the AP model that we’re actually going to install.
So let me quick select again and just change those back. So we’re going to these access points back AP 43s, and we’ve got our nice primary coverage sorted again.
Now, one thing you’ll notice about this design is I’ve placed all the access points inside rooms, or above an open office area. I’ve not put any access points in corridors. Why is that? Well, let’s take a look at why I’ve not done that. Instead of looking at the coverage from all the access points, I’m just going to pick a particular AP. So we’re going to look at this one AP, and let’s look what happens if I place this access point in its corridor outside this room. Now, by placing it in a corridor, it is providing coverage into the rooms direct where it’s outside and actually ones on the other side of the corridor as well.
But one of the problems with placing APS in corridors is you get these really long tails where the signal goes in open space all the way down the corridor. There’s nothing to attenuate a signal, so it just provides really good coverage for the entire length of the corridor. But what’s the problem with that? Well, the problem is what happens as you go round the corridor? As I walk round this corridor, my signal strength drops up very, very quickly. So at the end of the corridor here, if I hover my mouse over, I’m getting a signal which is -53 dBm. That’s a really good quality signal. But within literally two steps, my signal strength has dropped right off to -100 dBm there, so basically no signal. So I go from a really good quality signal, literally two steps around the corner, and my signal drops off. You can see these contour lines here, how close together they are. The contour spacing is five, so there’s five db we’re losing every contour spacing. Should select that access point again.
You can see just how quickly my signal strength drops off from being really good to nothing. Why is that bad? Well, mobile devices generally have something built into them called a roaming threshold. That is when their signal strength drops below a certain signal strength, a certain value, they’re going to start to look for another access point to which they can connect to, which they can roam to.
The problem with this design is, I’m going to be at the end of this corridor, and I’m still getting a fantastic signal from the AP active rend. So my client hasn’t even hit that threshold yet. It’s not even tried to find another access point to roam to. It’s really happy on the access point it’s connected to. But we take two steps around the corner, and it’s got no signal, and it goes into panic mode. “Ah, I’ve got no signal, I’ve disconnected, I’ve got to find something else to connect to.” And it’s, at that point, going to start trying to find something else. All the time, you’re walking up here, and you’ve been disconnected, and you’ve got no connectivity. And we want to try and avoid that. We want to try and avoid situations where these contours drop off like a cliff.
So let’s look at how we can do this. Well, let’s just take the same access point and pull it, drop it down into one of the rooms. What’s happened when I’ve done this? Well, first of all, if we look at these contours, I say, drop off round the corridor, we don’t have the really dark green ones now flying all the way down to the end, and these lighter green ones and orange ones are a much bigger area. So as I walk down the signal, my signal’s going to slowly drop off, and I’m going to get to this point and go, “Oh, let me try and find another AP to connect to.” But while I’m doing that, I’ve still got a good quality signal within my requirements to be connected to and transmit data, and I’ve got time to find another access point, possibly this one here, which I can discover and connect to, which will lead me all the way around this corner, and again, I got time to discover this access point and connect to that one. So APs means I get a nice smooth handoff.
You’ll also notice just how much better the coverage is within the rooms surrounding the APS. If I put this one back into this corridor, I’m starting to lose signal at the back of these rooms. It’s not so good. But by moving it into the room, I’ve got much better quality signal in more of the rooms that I do have there.
And a rule of AP placement, this is probably my number one rule, is put your access point where your users are, as close to the users as possible. Are users really doing a lot of Wi-Fi out in the corridor? No, but you provide fantastic coverage out there. Where are the users? They’re in the rooms. So again, we’re going to place access points in the rooms. The closer an access point is to the user, the better the signal strength will be. The better the signal strength, the higher the data rate. The higher the data rate, the better performance. So if you want slow, badly support performing Wi-Fi, then corridor APs work quite well. If you want fast, good performing APs, keep the APs down into the rooms. So that’s why we try and avoid corridor APs if at all possible.
Sometimes there are exceptions to all of these rules. But as a general rule of thumb, we want to try and keep APs close to where the users are. And to give a good roaming experience, we want to try and avoid APs being placed into the corridors.
And that’s how we design for primary coverage. And we can see here that with six access points, we’ve designed our office quite comfortably for primary signal. Do join me for the next video in this series where we’ll be looking at designing this office for secondary coverage. Goodbye for now.
Primary coverage is the signal strength from the access point with the strongest signal. The primary coverage requirement will define the minimum primary signal strength required in each location.
Next Videos


